This blog isn't being updated any more... and you know why? It's because my blog has moved!
My new one is called Tut Suite, and you can see it here.
http://tut-suite.blogspot.com/
Wednesday, September 23, 2009
Thursday, July 30, 2009
Tutorial: Adjusting the length of link bracelets
Link bracelets are a lot of fun - I just bought a bunch of blanks and I can't wait to start gluing cabochons, buttons, and whatever else will fit onto them. But I have tiny wrists, and often as not the bracelet is just too big.
Here's how to shorten them.
YOU WILL NEED:
~ Pliers, two pair (crimping pliers actually work well for this)
~ A link bracelet or link bracelet blank

There are many different types of link bracelet. The kind at the bottom of the picture actually has the jump rings soldered together, so it won't work for this tutorial.

On the end of the link bracelet without the clasp, find the break in the jump ring one link in.
(See blurry red arrow.)

Using two pairs of pliers, grip the jump ring on either side of the break and twist the ends of the jump ring apart.

Slide the link off of the open jump ring.

Using your pliers, grip the ends
of the jump ring and twist it closed.

This is what you should end up with. Don't throw away the single link!
Voila! A perfect fit!


Before + After
Sunday, July 26, 2009
Twitter and Facebook
Friday, July 24, 2009
Stolen Laptop & Shop Makeover
Hello all,
It's been a long time since I updated, I know - life has been hectic. I have some good news, some bad news, and some news that could go wither way.
Bad news: My laptop was stolen. Which makes it much harder to update this blog and my etsy shop.
Good news: I have a new tutorial ready for this blog (should be up on Monday), and losing my laptop gives me more time to craft new items instead of playing World of Warcraft!
I am also doing a complete restructuring and makeover of my Etsy shop. I will have new items and old reorganized, repriced, and probably rephotographed.
I'm also casually scanning the market for a logo/business card design... if you know any good people PLEASE link me to them.
My new tutorial is about adjusting the length of link bracelet blanks and an alternative to the awesome but ever-expensive Aanraku pendant bail.
Tuesday, April 28, 2009
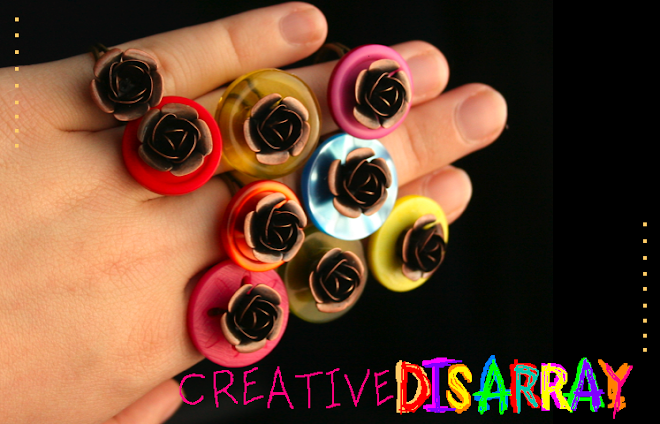
Rings! Rings! Rings!
I have been on a ring-making frenzy.
First I ran out of ring blanks. Then I discovered an old stash of vintage buttons. For weeks I had button stacks sitting in my room waiting to be made wearable! So I ordered 20 ring blanks, and the result...

A rose garden of rings!
I also made a couple rings without the copper roses:


And I can tag Vintage onto the title because they're made with vintage beads!
Regarding the photo tips series - it will continue, but is on a temporary hiatus because between teching a local play and the insanity of finals, my spare time is nil. (Nil is a word that doesn't get used enough.)
Thanks for your patience! I hope you enjoy my creations.
Saturday, April 11, 2009
Help!
I need your help! I made these beautiful button stacks with vintage buttons and now I don't know what to make with them! I only have two.

What do you think?
Two rings?
Earrings?
Hairpins?
Something else?
I'd love to work them into a necklace or a bracelet somehow, but how??
Please help!

What do you think?
Two rings?
Earrings?
Hairpins?
Something else?
I'd love to work them into a necklace or a bracelet somehow, but how??
Please help!
Friday, April 10, 2009
Tips for Good Listings: Lighting and the Evils of Flash
A recent edition of the email newsletter for Etsy Sellers commented on the evil that is flash, but I would like to expand on why it is evil, and also address the horrors of tungsten lighting and the importance of white balance.
I've photographed a pair of earrings that I made. Because I made them for myself, they are clip-ons. However, if people like them enough, I may remake them and sell them.
We'll start with flash.


Flash vs. Natural Light
OK, the difference is clear. But I'll point a few things out.
In the photo with the flash, the colors are different, and the shadows are harsher. And the photo with flash is actually darker than the photo without! But more than all that - is that the kind of lighting you'd normally see the item in?
Unless the item is something that would normally appear in harsh light - and I can't think of anything that would - don't photograph it using that light.
This does not apply for artistic photography - flash can produce some interesting results by accident or if you know how to use it.
OK. Now to lighting in general.
USE NATURAL LIGHT.
Tungsten is Evil.
Tungsten makes everything orange. Even when using tungsten white balance, the colors are off.
That being said, bright daylight is very bright and will create some pretty harsh shadows. Cloudy days are your friend.
I'm lucky. I have a sort of frosted plastic covering the outside of my window for additional insulation. I always have great photography light.
Windows are your friends. Set up your photos on the windowsill, maybe early in the day when the sunlight isn't as harsh.

White balance is very important as well. Your photos will look blue or orange with the wrong white balance - and you CAN'T rely on auto-white balance. The colors on your items need to be true to life.
Photos taken in tungsten with different white balances:


Big differences, right?
Various white balances in natural daylight:


Once more, a big difference.
The completely blue one is tungsten white balance. Maybe that gives you an idea of how warm tungsten light is. ((shudder))
So pay attention! Bring out the booklet that came with your camera, find out how to adjust the white balance, and then play with it until the results match reality.
Next I'll talk about shutter speed, and photographing in manual mode. =D
Corrections? Comments?
Subscribe to:
Posts (Atom)
